Thursday, 31 October 2019

WIP on more Refinery Bits and other installations.

The Refinery has had more parts added and more underway.

I have been on a College course for about 3 months. Then my Brother was taken ill and had to have a Heart operation. So I have been lax posting. He is now on the mend.

Anyway. To distract myself I have been adding more scenery and making a dent in my "spares box."

PDQ rolls, National Lottery rolls, Heroclix Bases, Kit Plastic Sprue bits and anything else I could find that looked like it might fit got stuck to bases then painted. Here we go.

I went a bit mad with the plastic kit sprues used as piping on a few of theses. Found 2 old bottle tops for antiperspirant roll on bottles for the one on the forward right of this picture.
 PDQ rolls, Rolls for the national lottery machine plus spares from other plastic kits in abundance used in abundance here. Kinder toy holder to the left upper as another kind of storage or distillery part.
 Centrally in picture 4 PDQ rolls used with heroclix dial bases mounted on top of useful wooden circular discs from "The Works" for some other type of storage. Empty cellotape inner rolls were useful add-ons near the top and old Britains Star Gard bases hid some sins.
 Most of the new stuff all together.
 Ping Pong balls and Kinder inner toy capsules. A lego windmill blade on a tower placed behind.

WIP more to get done. I always build more than I can get finished. These 2 just got partially done before I moved on to something else to break up the monotony for a while.


Another layout before a a game will be on the cards as soon as I can get everyone together and it gets a bit warmer in my game room.

Sunday, 25 August 2019

Celtic type cross made from a wooden key.

I found a pack of "Wooden Key Embellishments" in my local The Works Publisher shop.

They are in the craft section and are laser cut wooden things. The pack contains 5 or 6 different key designs. I was going to buy 2 packs and use them as Temple engravings. I still may do this.

But with this one I decided to make a free standing Celtic type cross. Another pack of Works wooden discs provided me with loads of bases in three different diameters. Pebbles out of my front garden, some base tufts a bit of milliput and use of a craft knife to cut the keyed section from the key.

Here is the result.


I used a Gold and a Black fine liner pen to draw on some decoration after painting. I will add this piece to my Graveyard or Jaffa games. Set decoration again. You can't see the base in these shots. But it is nothing special really.

Even newer WIP Refinery builds.

It has been a while since I made a new post. But I have been working on new stuff in bits and bobs across all the subjects on the Blog.

Here are some of my latest bits for my Modern/Sci-fi scenery.

The main sections of most of these storage vessels are made from credit card PDQ machine rolls, cash register receipts rolls and some thicker Lottery Machine ticket rolls.
The pipework sections are made from cut down sections of plastic kit sprues that I have kept and asked my friends if they can keep them aside once they have built the kits.

 It does help to keep all useful looking bits and bobs from various kits, cheap games and electronic devices in you spares containers. Bases from Heroclix are incredibly handy as toppers for storage vessels.


 These Wall Anchor parts make very nice decoration for pipe/sprue bases. Also add a lot of strength to the fixture at the base. I only had a limited number at this point. I intend to get more of them. At £1 for a bag of 6 anchors they will go far.
 Some of the pipework here does not include the anchors. This was before I discovered how useful they were. Experimentation is the key. The rolls are covered in Aluminium reflective tape. More to seal the cardboard rolls from any paint absorbtion than decoration. Very easy to smooth out after application and can give an underlying metal scratch effect to painting afterwards.


 Lookout for the wooden shapes in the Works Publishers. Under the craft section. Many things there can save you a lot of time. One disc here tops the larger roll in the background. The disc on the front roll is actually a clock face dial. The pen refill was out of teh spares box.
 On this one the use of an old biro pen case as an exhaust chimney and on the base a pure juice carton opener on the base just gives some detail.
As you can see from the bottom picture. All of these builds need more little bits of detail and painting to make them more pleasing. But the general idea is coming along nicely.
The bases were made from my label wrapping technique over a drinks coaster. Another thing I found in my local Poundland. They had squared corners and were reduced to 25p for packs of 4. I can't seem to find anymore of them. Even in other Poundlands!

Sunday, 14 July 2019

You tube channel. Guy is brilliant!

Not quite my usual posting. But this guy is a fountain of modelling ideas and brilliant at it.

Sci-fi and military modelling and well worth a look.

https://www.youtube.com/user/idaemon

Saturday, 6 July 2019

More added to my Matchbox Adventure 2000 armoured force.

A couple of other builds for the Adventure 2000 Corps.

This vehicle I left the old flip top missile launch bay doors open. I decided that the doors would make a stowage area for lockers and equipment bags. I salvaged backpacks from my spares box and anything else I thought would make interesting stowage.

I have also been experimenting with the cheap "Knock off Lego" Poundland had a few £1 kits and the wheels do make a useful resource for repair and replacement on this range of Die-casts.
Below is a turret I made from them as well. There is an actual working turntable mount you can super glue onto a flat surface. Be careful not to gum up the turn table itself! The flat topped thin tiles of Lego make good stowage boxes as well. It you want to add more to other vehicles.

I have actually built 2 more very Sci-fi looking light Auto-cannon turrets as well. Look for cheap Lego and remember! It may not stay together itself very well, but once you have your design glue it together! Obviously paint it as well.

New stuff for Pulpy Goodness.

Here some various new stuff I have been working on all the time I have been absent from posting.

I am sorry to those who have been waiting for updates. A lot has happened  to me over the last few months.

Here we go.

This is 2 of the old Hornby "Raised Bridge" kits put together. I got them at a Toy Fair in Walsall. They only cost me £9 together. I just added some additional Iron work fencing across the top of the 2 bridges to slightly reinforce the bond strength of the build. Very simple paint job as you can see. Greys and metallics. More bridges are great!


These were made from 2 towers I already had built. With of course the newly added Bacardi rum bottle toppers my Brother donated. They will make great side towers for the entrance to the castle of the Undead Count.
 The towers are simply long strong cardboard boxes covered in sticky labels and topped with Jenga block battlements. Pity there was no room for guards to man the tops. But flying creatures may be able to fit up there. The bats bases had to inset in 2 different sized plastic cello-tape inner rolls and a hole still had to be punched in the top of the tower. Mainly because the bottom of the topper was good strong metal and I had nothing to cut through it with.


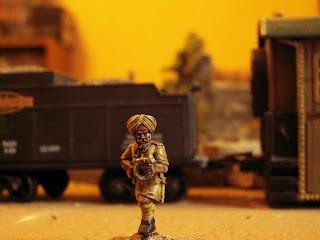
Bob Murch Pulp Figures. Sikh Heavy weapons pack. I love the Pulp range. Plus once I saw the ATR in this pack I had to get it.
Officer

Lewis Gunner

Thompson SMG with C type Magazine.

Anti-tank Rifle. Love it.

Bren Gunner

More close ups of above. Some didn't turn out!


This is the Christmas Wild West Style engine from my Previous posts. All I have done so far is experiment with darkening it right down by spraying it black. Then added some extra bits from cheap biros and a few washers. Painted the cab a bit and trimmed some parts with metallics.
I am still working on it to make it look more to my taste.

An Iron wagon made from an upside coal tender from one of my other engines.

Quite a Diverse bit of stuff. More to follow.

Thursday, 9 May 2019

Lookit these.

Bat out of Hell


Well I got these through the post today.

Castle Dracula Entrance way on the cards!

My older brother sent me these. I got 3 of them in total.
Bacardi logos that weigh a fair bit each.

Now all I have to do is build something strong enough to support the weight.
They are mainly made of metal. Have to think of some way to disguise the pipes coming out of the back of each Bat.
The Front
 The Back
 Me wondering what to do next?
Sorry about the shocking image and the Jumper!!!


Tuesday, 7 May 2019

The Temple of El-Viz

The Temple of EL-Vis

This absolute huge monstrosity has taken me ages. (Mainly because I was ill for 2 months and then on a course for 2 weeks)

But I at least now have it done to a usable state. The Back definitely needs more work. I will continue adding to the whole model overall though.

The Main body was a Mercedes car Filter. My Brother owns a Garage and gave me this near my Birthday. It had done it's duty as a filter and he thought it was a very usable shape for my lunacy.

I almost instantly thought Jukebox! Then Juke Box Temple! Off to Jaffa it went.

Covered in my Address label technique then under coated to within an inch of it's life. I had to base it.
The filter it self is made of high impact acrylic plastic. It had a hose fixture at what is now the bottom of the temple. It was an integral part of the whole piece and short of high speed cutting tools I wouldn't have been able to cut it off without destroying the whole thing.

So imbedded in cork and wall filler it was. I had to base the whole model to hold it in place. Also added 2 bits of my Jenga steps to give access to the main entrance.

The main entrance was only recently added. I made a suggestion of an ornate doorway from two sets of laser cut wooden clock hands. These I found in The Works Publishers, crafting section. £1.50 for a set of 4 clock faces, (all to small for the hands included and 2 double sets of clock hands) A bit of modifying with a sharp knife and PVA them into an arch.

Hairy string teased out and PVA'ed in place as vines then paint the whole structure in the Jaffa style with Testor Pots £1 each from Wilko. That was my basic build.


 The track selection listing

 A set of French I think rubber stamps from the Works helped me out here. As my freehand is rubbish!


I still have to add some scrub and I daresay I will think of further modifications along the way. But it already weighs a ton!